
DIY is the new trend of the era. Everyone wants to create customized products for personal utility or display, from cooking to pottery, interior design to home essentials. The few flaws and slight imperfections of the creations are (liberally) excused – as the creator and the end user are the same. So, all those little blemishes make the artwork look distinct and pass the quality check with flying colors.
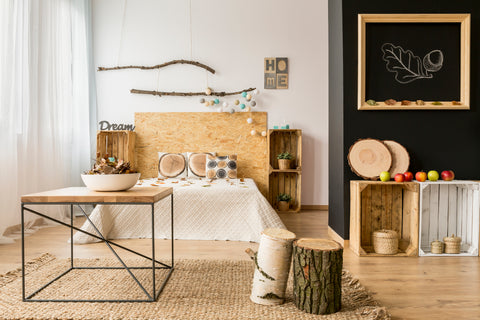
Photo by photographee.eu on depositphotos
Follow These Simple DIY Hacks To Give Your Home A Stunning Look:
- Declutter and Unclutter
- Spruce Up The Walls
- Rearrange and Revamp The Furn
- Brighten Up With Lights
- Upgrade Handles
- Magical Mirrors
- Introduce Foilage
- Deck Up The Vase
- Change The Curtains
- Install Floating Shelves
- Mason Jar Reuse
- Decoupage Old Things
- Frame Artwork
Try these cool upgrades to give your home a fresh look. Welcome to the world of DIYers! Let’s get on board!
1. Declutter And Unclutter:
Though this might not sound like a flashy DIY hack, it can do wonders. Clear out unwanted and unused stuff that has been gathering dust and taking up space.
Once the unnecessary things are out, tidy up the rest of your stuff. You will be surprised to realize how much free space you really have!
2. Spruce Up The Walls:
The goal of our next DIY project is to give a much-needed facelift to your walls. Achieve it by painting them in a different color or trying color-blocking techniques. It would completely change your room’s atmosphere into a fresh one.
If you feel painting is way too much work, try putting on wallpapers instead. A wide range of patterns, designs, and styles of wallpapers are available in the market. Choose one that complements your interiors.
For a complete makeover of your walls, you can dress them up with wall paneling. Customized accent walls are also a great option.
3. Rearrange and Revamp The Furn:
Change the furniture layout and see which one works best for you. Keep the functionality in mind while doing so – meaning it should be practical in terms of accessibility and comfort.
If your furniture is old or damaged, give it an overhaul – repair the damage, sand it down where necessary, repaint or stain it, cut out old and worn-out furniture fabric, and cover it with new material. And finally, change the hardware of your furniture to make it look gleaming and brand new.
If your furniture doesn’t need any makeover, give it a fresh look by introducing a few cushions and a throw blanket or changing the covers of your old toss pillows.
You can make cushion covers in a jiffy by recycling old bedsheets or dresses. Or with new cushion fabric, of course!
Don’t worry if you don’t own a sewing machine or know how to sew. There are numerous no-sew cushion cover-making ideas available on YouTube.
Paint your coffee table or side table creatively to suit your room’s decor.
Change the facade of your furniture from drab to fab using these ideas.
4. Brighten Up With Lights:
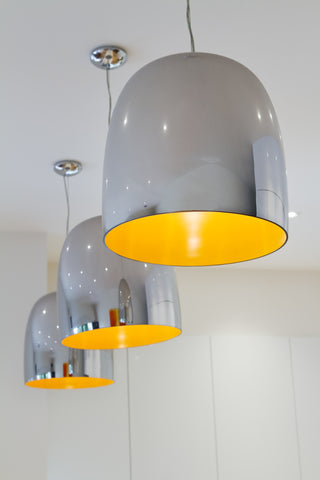
Photo by jodiejohnson on depositphotos
Good lighting can brighten up your living space like nothing else. So, replace your old generic light fixtures with new eye-catching statement lights that reflect your style and taste.
Whether it is the chandelier, pendant lights, or any other unique lamp fixture, a change in lighting can work miracles and transform the ambiance of your room.
5. Upgrade Handles:
Something as little as changing the door knobs, drawer pulls, or cabinet handles can be such a game changer in your DIY renovation journey.
Choose matching hardware that goes along well with the rest of your room’s decor. So, go for something stylish and beautiful that reflects your personal taste.
6. Magical Mirrors:
Hanging mirrors can add a touch of magic to your living space. It creates the illusion of more space and helps reflect more natural light.
Convert the plain mirrors you already have into decorative art pieces of interest. Artistically adorn their frames with sea shells, beads, tiny mirrors, rope weaves, macrame edging, wood, floral, fairy lights, wood sticks, or even a money plant. Pick one that appeals to you and will match your home decor.
I bet they will scoop the “Best Art Pieces Of The Room Award” in no time. And you will be their “most viewed” fan, followed by your family and guests.
7. Introduce Foilage:
Select these all-time (ornamental) favorites for your home according to your taste and space – flowy, bushy, climbing, creeping, and so on. Indoor plants purify the air and add good looks.
Indoor plants are said to destress, boost productivity at work, can be therapeutic, improve your mood, and make you happy.
Hang them, sit them on the window sill, on the shelves, or wherever you have a spot to put your lovely green friend on. Sit back, relax, and enjoy nature every day!
If you think you can’t care for real plants, opt for faux plants instead – for some green beauty. (It is believed that the green color is calming and relaxing to the eyes).
8. Deck Up The Vase:
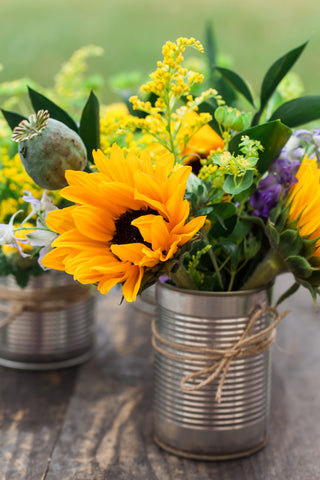
Photo by Mkucova on depositphotos
Transform your plain vase into a trendy one with these DIY hacks:
Painting: Use acrylic colors or spray paint for metallic or ombre effects. Consider giving chalk paint a try too.
Use an acrylic color-baking soda combo to create texture and a faux ceramic look to your vase.
Create abstract designs, patterns, or stencil motifs on your vases for intricate work.
Threadwork: Use jute twine, ribbons, or cords to wrap over your vase for a rustic appeal. Start from the top and secure the thread with glue as you work around and down the vase.
For extra flair, add floral, bead, or stone embellishments.
Etching: Etch the vase glass using the stencils to imprint your favorite quotes or designs.
Clay Mould: Use clay to make design molds over the vase and paint it with a contrasting color to accentuate the design.
Embellish: Add glitters, beads, mirrors, or stones to decorate your vases for a gorgeous look.
If you don’t have a vase to beautify, use what you have in hand to make a vase from scratch: plastic bottles, wine bottles, PET bottles, mason jars, etc., and turn them into stylish vases.
9. Change The Curtains:
Update your curtain fabric to suit your home’s interior decoration. Stitching up your curtains can bring a lot of joy and satisfaction. And it is no biggie!
All you need is a curtain fabric of your choice, a sewing machine, and some basic sewing skills.
Take the measurements of your windows and doors before purchasing the curtain fabric. Always buy extra fabric so you don’t fall short of the material when you make them.
Explore the mind-boggling range of curtain fabric collections before making your purchase.
Decide them based on your preference from the various designs, patterns, textures, materials, and colors.
Consider the pros and cons of each fabric and your budget, and see if the color, pattern, and texture will match the rest of your home decor, etc. – then go for it.
Choose to dress up your windows with valances when you want more natural light to flow in. They work well alone or in combination with other drapery. Use a valance if you don’t want to show your drapery hardware.
Or simply use a Roman shade. Making a Roman shade is more tricky than a curtain but is doable.
Hanging your handmade drapes is a moment of pride and joy. Enjoy the transformation!
10. Set Up Floating Shelves:
Installing floating shelves on your walls is a terrific way to exhibit your books, artwork, or plants.
Build your shelves using wood planks, brackets, and some essential tools. Reclaimed wood is an excellent pick for the wood option. Repurposing old and unwanted materials is a great way to do eco-friendly DIYing.
Floating shelves create additional storage space while maintaining the beauty of your room.
11. Mason Jar Reuse:
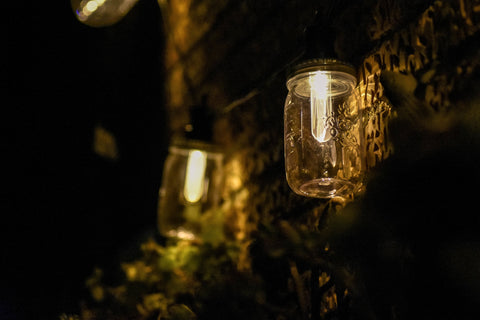
Photo by Wirestock on depositphotos
Mason jars are whimsical wizards that can transform into anything, and you can use them anywhere.
A. Flower Vases: Paint, frost, etch, wrap, paste – do anything you wish and convert them into fresh flower vases. Stand-alone or grouped, they are simply beautiful.
B. Hanging Lanterns: Tie twine or wire to the neck of the mason jar and hang them, putting a candle, tealight or battery-powered light, or mini lights. Now dangle them inside the house or out on your porch.
C. Kitchen Jars: Mason jars provide the comfort of storing your spices, condiments, and other kitchen supplies in a neat, presentable way. Also, these uniform containers make an eye-catching display. Label them neatly and use them to keep your supplies organized.
D. Candle Holders: Use your mason jars as candle stands by putting tealight or votive candles inside them. Decorate it with laces, twine, jute, or ribbons. Place colorful pebbles, sand, or glass gems to add an element of visual interest.
Or make your own candles. Melt candle wax, and add 2-3 drops of essential oil like lavender or lemongrass. Insert a pre-waxed wick inside the mason jar and keep it straight with the help of a wick clip and a pencil. Now pour the molten wax into the mason jar. Wait for it to cool. You’ve officially made your first scented candle! Light it up and enjoy!
You can also add dried flowers or leaves for adorning your candles while making them.
E. Light Fixtures: Recast your mason jars into stylish pendant light fixtures. Attach a light kit to the jar’s lid and suspend it from the ceiling or wall. Isn’t that cool?
F. Desk Organizers: Store pens, pencils, and other office supplies in your mason jars. Decorate or paint them to make them look stylish and trendy.
G. Party Essentials: Use them to serve individual portions of refreshments or desserts at the party. Or fill them with candies, treats, or party favors. Decorate them with ribbons, tags, and labels, and make them look unique.
H. Mini Planters: Cilantro, thyme, dill, rosemary, chives, and mint are a few herbs that can be grown in mason jars. Fill the jars with soil and grow herbs in these planters. Place them on your kitchen windowsill.
Utilize the fresh herb supply that is within your arm’s reach. Pluck them when necessary and add them to your dishes while cooking.
Your herb garden is a matchless addition to your cooking space that has effortlessly transformed your kitchen’s looks.
12. Decoupage Cups, Mugs, and Tin Cans:
Upcycle your old cups, mugs, and tin cans and make them into pen stands, flower vases, or a container to throw in your everyday essentials. Or even use them in the kitchen as cutlery or kitchen tool stand.
Things Needed:
Decoupage paper, mod podge glue, a container, and a brush.
Method:
- Wipe clean the exteriors of the cup/mug/tin can.
- Apply mod podge evenly.
- Cover it with decoupage paper. Apply a second coat of mod podge for a better finish.
- Let it dry.
- Exhibit it as is or use them to store things as planned before.
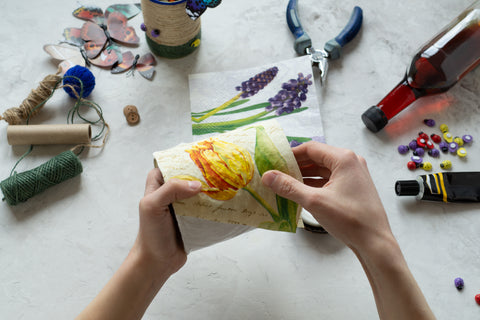
Photo by beregina84 on depositphotos
Alternatively, you can use the paper you have in hand, like wrapping paper or tissue paper instead of decoupage paper.
13. Frame Artwork:
Remember the hand and foot impressions of your child that you had taken. Or the beautiful birthday card that your kid drew for your birthday. Or just a random card you made last summer using dry-pressed flowers inspired by the flowers and wanted to preserve eternally. Even a lovely letter that your kid wrote as a child will do. Find all those keepsakes and take them out. Frame them to suit your living room decor.
Exhibit them proudly once the framing is over. They are better than the expensive artwork you buy at art shows and galleries.
If you don’t have any pictures as souvenirs, do not worry! Make a simple collage of your family photos or an event and group them. Now frame them and create an accent in your living room, making it a point of interest for yourself and your guests. And keep cherishing!